The First Thing You Need To Consider Before Butter Basting Meat

Up until this moment, "basting" might be a term that you associate only with roasting whole chickens or turkey for Thanksgiving. You might be imagining a bulbous baster, drawing in bubbling juices and delivering moisture to oven-parched poultry. But that's far from basting's only purpose nor its only method — so it's time for you to get familiar with butter basting.
As a concept, butter basting is fairly simple. In a basic way, all you're doing is spooning sizzling butter over your piece of meat to cook it, which provides a beautifully crispy sear on the outer layer and a luxurious, full-flavored taste. However, the cooking method does require some consideration and care to get right. Before you dive into butter basting, you have to make sure you've got some hands-on time to devote to the careful cooking process. Butter basting isn't a low-and-slow kind of technique and you'll reach doneness fairly quickly – but you can't leave the meat behind to cook while you focus on something else. Butter basting needs your attention.
Luckily, the results are worth the focus. The high heat, continuous butter drenching, and trusty Maillard reaction brown the meat beautifully to give it a toasty, nutty flavor and unforgettable sear. Just keep your eye on the pan and your head in the culinary game.
A few tips for a perfect sear on your steak

The concentration isn't just necessary because of the continual basting requirement — if you don't cook with care, sogginess can set in and you'll lose butter basting's signature sear. That's why you don't start with butter in the pan immediately. Instead, you'll heat up a little oil until it's sizzling, then add the steak. Allow it some time to start browning in just the very hot, oil-coated pan before introducing the butter and any aromatics. If you add it right at the start and baste from the beginning, the butter will just make the steak's crust soft instead of crispy and will often become burnt itself before the steak has time to cook through.
The reason the butter risks burning if you add it from the beginning is that the pan temperature has to be kept high throughout the process. The high temperature helps with the steak's sear, but it's also practical for your butter. If the butter is just barely melted, its high water content will saturate the steak with moisture, but if the butter stays sizzling, the water will evaporate quickly and the steak will be permeated with flavorful fat instead.
While you're spooning sizzling butter over your decadent at-home steak, you'll also have to focus on flipping. To get that good crust, you should plan to flip every 30 seconds to a minute so that it cooks evenly and one side isn't overdone. It's helpful to have a thermometer on hand for an accurate temperature assessment.
Give your pork, chicken and fish the butter-basting treatment, too
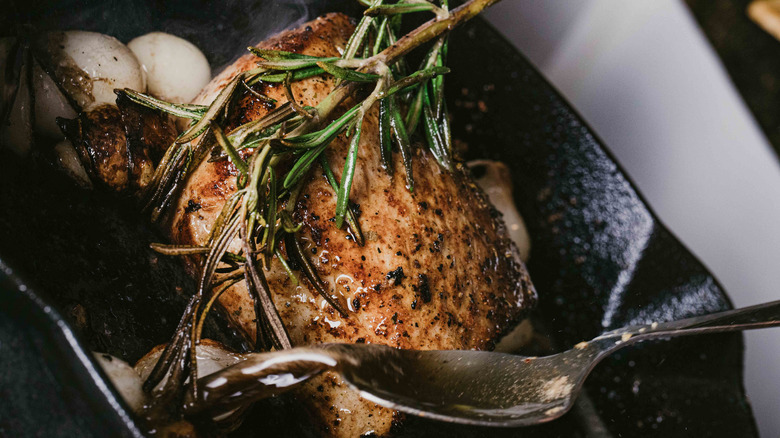
Butter basting is just as delicious for more exciting pork chops, chicken, fish, and other meats. Butter basting chicken or pork follows the same process as steak — you'll sear it in a hot, oil-coated pan first before adding butter and beginning the basting process. To make sure the chicken in particular is safe to eat, it's helpful to sear each side for longer than you would a steak and rely on that thermometer to ensure that the chicken interior reaches 165 degrees Fahrenheit. With any type of meat you choose, butter basting works best on smaller cuts because large cuts will get overcooked on the outside before they reach that middle doneness; so try it with a pork chop instead of a pork rack or with a steak rather than a large roast.
Fish requires a bit of butter-basting adjustment, which only makes the process easier. When butter basting fish, like a fragrant thyme butter-basted salmon, you'll forget the flip. Instead, keep the skin side of the fish down in the pan and allow the butter basting to cook the other side. Fish permits this more delicate, flip-less cooking method. And in the end, you'll still get a bold butter flavor.